Hi All!
I have not create any new posts for a while now and it is because my CCIE R&S lab exam in Belgium is approaching really fast in exactly 68 days and I must admit I have never studied harder probably in my entire life !
I have been using this set up for a few months and it is great for instance if your doing NAT or QOS cause you can literally see how the traffic is classified , you can shape it , police it using legacy and MQC QOS techniques and basically you can practice tons of things with it and it’s really simple to set up.
In order to connect your GNS3 network to the internet you have to do the following :
1- Build your network
2- Go to command prompt CMD and type “hdwwiz.exe” and hit enter
3- Wizard window will open. Click NEXT and choice Install the hardware that I manually choice from the list.
4- Choice Network Adapters and click NEXT.
5- Choice Microsoft category from the list at the left side of the windows and than Microsoft Loopback Adapter. Click next. After installing a new adapter will appear at your network devices window
6- Now you need to allow your PC interface that connects to the internet to be used by other networks. I use wireless adapter to connect to the internet so simply go to your Network Connections , select the adapter you use to connect to the internet , Right click on it and select Properties, now go to the Sharing tab.
7-Select Allow other network users to connect through this computer`s internet connection: check box, and select the previously created Microsoft Loopback Adapter as it shown on the picture (mine is called Local Area Connection 2)
You have just shared your real internet connection adapter with your created loopback so all you have to do now is go back to your GNS3 and associate your loopback with the GNS3 cloud.
BTW IP address should automatically be generated to this loopback by your real internet adapter. In my case it is 192.168.137.1 /24
Go to your GNS3 router and give it an ip address from the same subnet , I’ve assigned 192.168.37.10 255.255.255.0
You also need to create a default static route as you would normally do in the real world on a perimeter of your network pointing to the clouds (loopback) ip address which essentially from now is acting like an ISP
and that’s all !
From the router you should now be able to ping whatever it is out that is pingable 🙂 , let say global DNS ? or bbc.co.uk or google etc …..
You need to enable ip domain-lookup to get DNS name resolved.
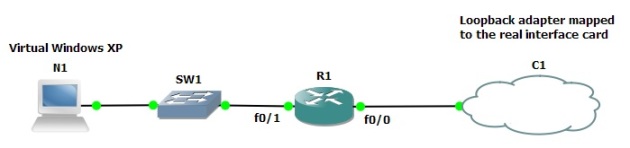
Great thing about this set up is that you build your network behind R1 in our case , connect few more router , switches , VM and , practise NAT , NTP , Routing Protocols (if your home router support them) and many more.
I personally use this sort of gns3-internet connectivity mostly for QOS , shaping , policing and other congestion avoidance and management techniques because once you configure for instance MQC shaping on R1 F0/0 or policing on F0/1 and start doing some file transfers from your VM etc you can clearly see and manipulate traffic differently and to have even more fun you can involve your home router and configure QOS on it if of course it supports it ….
One more thing , every device which is behind R1 (to the left) in our topology in order to get out to the internet you will need to configure NAT on R1 so let’s say if our N1 machine was a windows XP VM , you will have to configure static , overload , pool or whatever NAT you fancy in order for it to access any websites out there , and then you add some QOS and police HTTP traffic from this VM and the fun begins all over again 🙂
Enjoy !
Tom


Recent Comments